
Let me start with a confession: I used to be a die-hard gym rat. Every morning, I’d drag myself out of bed, drive 20 minutes to the local fitness center, wait for equipment to free up, and then rush back home to get ready for work. It felt like a chore—something I “had to do” instead of something I looked forward to. Then, two years ago, I decided to make a change. I cleared out a small corner of my backyard, rolled out a yoga mat, and did a 20-minute flow as the sun came up. That morning, I felt something I hadn’t felt in years: joy while working out. The fresh air, the sound of birds chirping, and the warmth of the sun on my skin turned a tedious routine into a moment of peace and strength. Since then, I’ve transformed my outdoor space into a versatile fitness haven, and I’ve never looked back. Today, I’m sharing everything I’ve learned—from setting up your own backyard yoga nook or gym to mastering outdoor workouts like running, strength training, and more—so you can ditch the gym, embrace nature, and make fitness a seamless part of your daily life.
If you’re tired of crowded gyms, expensive memberships, or feeling cooped up indoors while you sweat, this guide is for you. Outdoor fitness isn’t just a trend—it’s a lifestyle that connects you to nature, boosts your mood, and makes working out feel like a gift, not a burden. Whether you have a sprawling backyard, a tiny balcony, or just access to a local park, you can create a space that works for you. I’ll break down exactly how to set up your outdoor fitness area, what equipment you actually need (spoiler: it’s less than you think), and how to tailor workouts to your space and goals—whether you’re a yoga lover, a casual runner, or someone looking to build strength without a gym.
Why Outdoor Fitness Beats the Gym (For Me, Anyway)
Before we dive into the “how,” let’s talk about the “why.” I know gyms have their perks—air conditioning, endless equipment, group classes—but for me, outdoor fitness has been a game-changer. Here’s what I love most about working out outside, and why I think it’ll resonate with you too:
- No More Excuses: When your gym is steps from your back door, there’s no “I don’t have time to drive” or “It’s too cold to leave the house.” I’ve found that I work out 3x more often now that my fitness space is right outside—even on busy days, I can squeeze in a 15-minute session without disrupting my schedule.
- Nature Boosts Motivation: Studies show that exercising outdoors increases endorphins (the “happy hormones”) more than indoor workouts. There’s something about being surrounded by greenery, fresh air, and natural light that makes even the hardest workouts feel easier. I used to dread burpees; now, I do them while looking at my garden, and suddenly, they’re not so bad.
- Versatility: Your outdoor space can be anything you want it to be—a yoga studio, a strength training gym, a running track, or all of the above. You’re not limited by the gym’s layout or equipment; you can mix and match workouts to keep things fun and challenging.
- Cost Savings: Gym memberships in the U.S. and Europe average $50–$100 per month. Over a year, that’s $600–$1200—money you can spend on high-quality outdoor equipment that will last for years. I’ve saved thousands since ditching my gym membership, and my outdoor space is just as effective (if not more so).
- Mental Health Benefits: We all know exercise is good for our bodies, but it’s equally good for our minds. Being outside while working out reduces stress, anxiety, and even symptoms of depression. I often finish my outdoor workouts feeling calmer, more focused, and ready to take on the day—something I never felt after a gym session.
Don’t get me wrong—I still hit the gym occasionally (especially on rainy days), but 90% of my workouts now happen outdoors. It’s not just about fitness; it’s about creating a routine that nourishes both my body and my soul. Now, let’s get into the good stuff: how to set up your own outdoor fitness space, no matter how big or small.
Step 1: Design Your Outdoor Fitness Space (Even If You Have a Tiny Balcony)
The first step to outdoor fitness success is creating a space that feels inviting, functional, and tailored to your needs. You don’t need a huge backyard—even a 5×5 foot balcony or a small corner of your patio can work. The key is to keep it simple, organized, and focused on what you love to do. Here’s how I designed my space, and how you can design yours:
Assess Your Space & Goals
Start by asking yourself two questions: How much space do I have? and What workouts do I want to do most? If you love yoga and stretching, you’ll need a flat, open area for a mat. If you want to do strength training, you’ll need space for equipment like dumbbells or a resistance band set. If you’re a runner, you might not need a dedicated space at home—just a nearby trail or neighborhood street—but you can still create a small warm-up/cool-down area in your yard.
I have a medium-sized backyard (about 10×15 feet of usable space), so I divided it into two zones: a yoga/ stretching nook and a strength training area. This way, I can switch between workouts without rearranging everything. If you have a tiny balcony, focus on one zone—maybe a yoga mat and a small storage bin for equipment. If you have a large yard, you can add a running path, a pull-up bar, or even a mini trampoline.
Pro tip: Check your local municipal regulations before installing permanent equipment (like a pull-up bar or a weight rack). Most areas don’t require permits for temporary or portable equipment, but if you’re building something permanent (like a wooden platform), you might need to get approval first. It’s also a good idea to talk to your neighbors—especially if you plan on doing high-intensity workouts that might make noise (like slamming a slam ball). A quick heads-up can go a long way in keeping the peace.
Prepare the Ground
The ground is one of the most important parts of your outdoor fitness space—you want it to be safe, comfortable, and durable. Here’s what to consider:
- Yoga/Stretching Zone: For yoga, you want a flat, level surface. If your yard is grassy, that’s perfect—grass is soft and forgiving on your joints. If you have concrete or stone, invest in a thick yoga mat (I recommend one that’s at least 6mm thick) or a portable outdoor mat that’s water-resistant. I have a grassy area for my yoga nook, and I added a small outdoor rug underneath my mat to keep it from slipping when it’s dewy.
- Strength Training Zone: For strength training, you need a stable surface that can handle weight. Concrete, stone, or a wooden platform works best. If you’re using equipment like dumbbells or a weighted vest, you don’t want the ground to be too soft (like grass) because it can cause the equipment to sink or tip over. I installed a small rubber mat in my strength zone to protect my equipment and reduce noise—rubber is also great for absorbing impact if I drop a dumbbell by accident.
- Weather Protection: If you live in a place with rain, sun, or snow, you’ll want to protect your space. I added a retractable awning over my yoga nook to keep the sun off during hot summer days and to shelter me from light rain. For equipment, I have a weatherproof storage bin to keep my dumbbells, resistance bands, and other gear dry. If you don’t have an awning, a large umbrella or a pop-up canopy works too. In colder climates, you can add outdoor heaters to extend your outdoor workout season.
Add Personal Touches (Make It Inviting!)
The more you love your outdoor space, the more likely you are to use it. I added string lights above my yoga nook for evening workouts, potted plants around the edges to add greenery, and a small speaker to play music or guided meditations. I also have a water bottle holder mounted on the wall so I can stay hydrated without stopping my workout. Small touches like these turn a functional space into a place you look forward to spending time in.
If you’re short on space, get creative. Use vertical storage (like wall-mounted hooks for resistance bands or a rack for dumbbells) to save floor space. Add a foldable chair for resting between sets, or a small table for your phone, water bottle, and workout log. The goal is to make your space feel like an extension of your home—cozy, functional, and uniquely yours.
Step 2: Essential Outdoor Fitness Equipment (No Gym Membership Required)
One of the biggest myths about outdoor fitness is that you need expensive equipment to get a good workout. That’s simply not true—you can get an incredible workout with just your body weight. But if you want to add variety, challenge, and convenience, here’s the equipment I recommend (all of which is affordable, durable, and perfect for outdoor use). I’ve tested dozens of products over the years, so these are my tried-and-true picks:
For Yoga & Stretching
- Outdoor Yoga Mat: Not all yoga mats are created equal—outdoor mats need to be water-resistant, slip-resistant, and durable. My favorite is the Lululemon The Reversible Mat 5mm—it’s thick enough to cushion my joints, has a non-slip surface (even when wet), and is easy to clean. If you’re on a budget, the Gaiam Essentials Thick Yoga Mat is a great option (it’s under $30 and works perfectly for outdoor use). Avoid thin, indoor mats—they’ll slip on grass or concrete and won’t hold up to the elements. For beach yoga, look for a mat with extra grip to handle sand.
- Yoga Blocks & Strap: These are game-changers for beginners and advanced yogis alike. Yoga blocks help with alignment (like in downward dog or pigeon pose), and a strap helps you stretch deeper (like in seated forward fold). I use the Manduka Yoga Blocks (they’re made of foam, lightweight, and durable) and the Yoga Design Lab Stretch Strap. Both are affordable and easy to store in a small bag.
- Meditation Cushion: If you like to end your yoga practice with meditation, a meditation cushion will make it much more comfortable. I have a Zafu Meditation Cushion—it’s filled with buckwheat hulls, so it’s supportive but soft, and it’s covered in a water-resistant fabric that’s perfect for outdoor use.
For Strength Training
- Adjustable Dumbbells: These are the most versatile piece of equipment you can own for outdoor strength training. Instead of buying multiple pairs of dumbbells, adjustable ones let you change the weight with a simple twist or pin. My pick is the Bowflex SelectTech 552 Adjustable Dumbbells—they go from 5 to 52.5 pounds, are compact, and are durable enough for outdoor use. If you’re on a budget, the Yes4All Adjustable Dumbbells are a great alternative (they’re under $100 and go up to 40 pounds). For heavier strength training, consider adding a Yes4All Powder Coated Kettlebell—kettlebells are perfect for functional movements like swings, squats, and lunges.
- Resistance Bands: Resistance bands are lightweight, portable, and perfect for outdoor workouts. They’re great for strength training (like bicep curls, tricep extensions, and glute bridges) and for stretching. I recommend the Leekey Resistance Bands Set—it comes with 5 different resistance levels, a door anchor (for indoor use too), and a carrying bag. They’re made of durable latex that holds up to outdoor use, and they’re easy to store in a small bin. Resistance bands are also great for travelers—you can take them with you on camping trips or beach vacations.
- Weighted Vest: A weighted vest adds intensity to bodyweight exercises like push-ups, squats, and planks. It’s a great way to build strength without adding bulky equipment. My favorite is the Eric Flag 40 lb Adjustable Weighted Vest—it’s adjustable (so you can add or remove weight), comfortable to wear, and durable enough for outdoor use. It’s perfect for calisthenics and functional training, and it’s compact enough to store when not in use.
- Dip Station: If you have space, a dip station is a great addition for upper body strength. The Relife Rebuild Your Life Adjustable Dip Station is perfect for outdoor use—it’s sturdy, adjustable, and easy to assemble. You can use it for dips, pull-ups (if you add a bar), and even leg raises. It’s foldable, so you can store it when not in use, making it great for small spaces.
- Slam Ball: A slam ball is perfect for high-intensity interval training (HIIT) and building power. The Yes4All Slam Ball (15 lb) is my go-to—it’s made of durable rubber that can handle being slammed on concrete or grass, and it has a non-slip grip. It’s great for exercises like slam ball squats, overhead slams, and Russian twists. Just make sure you have a stable surface to slam it on (concrete or rubber mat works best) to avoid damaging your yard.
For Running & Cardio
- Running Shoes: A good pair of running shoes is non-negotiable for outdoor running. Look for shoes with good cushioning, support, and traction (especially if you run on trails or wet pavement). My favorites are the Nike Air Zoom Pegasus 40—they’re lightweight, comfortable, and have great traction for both road and trail running. If you’re a trail runner, the Salomon Speedcross 6 is a great option (it has aggressive lugs for grip on muddy or rocky trails).
- GPS Watch: A GPS watch helps you track your distance, pace, heart rate, and calories burned. It’s a great tool for setting goals and tracking progress. I use the Garmin Forerunner 55—it’s affordable, easy to use, and has a long battery life (up to 2 weeks). It also has built-in workouts and a heart rate monitor, so you can make sure you’re working out at the right intensity. For a budget option, the Fitbit Charge 6 works great too—it tracks distance, pace, and heart rate, and it’s compatible with most fitness apps.
- Mini Rebounder Trampoline: If you don’t have space for running, a mini rebounder is a great alternative for cardio. It’s low-impact (easy on your joints) and provides a great workout. The Bcan 40-inch Mini Rebounder Trampoline is perfect for outdoor use—it’s sturdy, foldable, and has a non-slip surface. You can use it for jumping jacks, high knees, or even just gentle bouncing to get your heart rate up. It’s compact enough to store in a shed or garage when not in use.
- Agility Ladder: An agility ladder is great for improving footwork, speed, and coordination. The GHB Pro Agility Ladder (20 ft, 12 rungs) is my pick—it’s durable, easy to lay out on grass or concrete, and comes with a carrying bag. You can use it for warm-ups or as part of a HIIT workout. It’s also great for athletes (runners, soccer players, etc.) who want to improve their performance.
Storage Solutions
To keep your outdoor fitness space organized, invest in a weatherproof storage bin. I use the Suncast 22-Gallon Deck Box—it’s durable, water-resistant, and large enough to hold all my equipment (dumbbells, resistance bands, yoga blocks, etc.). It also doubles as a bench, so I can sit on it to put on my shoes or rest between sets. If you have wall space, add hooks for resistance bands, yoga straps, or your running shoes. For smaller items (like hair ties, water bottles, or workout gloves), use a small caddy that you can keep on your storage bin or table.
Step 3: How to Master Outdoor Workouts (Yoga, Strength Training, Running & More)
Now that you have your space and equipment, it’s time to start working out! Below, I’ll break down how to do each type of workout outdoors, including tips for beginners, sample routines, and how to stay safe and motivated.
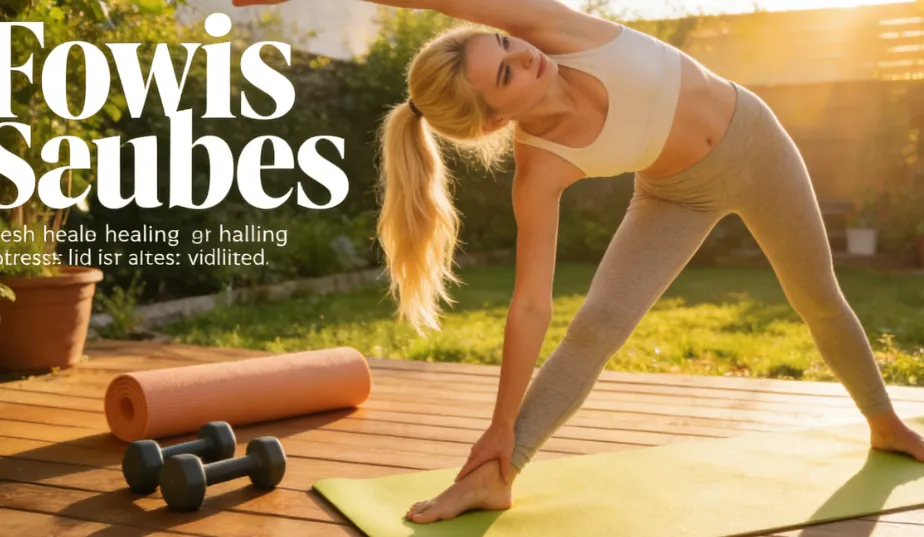
Outdoor Yoga: Find Peace & Strength in Nature
Outdoor yoga is my favorite way to start the day—it’s calming, grounding, and a great way to wake up your body. Here’s how to get started:
Choose the Right Time
The best times to do outdoor yoga are early morning (before the sun gets too hot) or late afternoon (when the temperature cools down). Avoid midday sun—you’ll risk sunburn and heat exhaustion. If you do yoga in the morning, you’ll start your day with energy and focus; if you do it in the evening, it’s a great way to unwind after a long day.
Pro tip: If you’re doing yoga in the sun, wear sunscreen (even if it’s cloudy), a hat, and lightweight, breathable clothing. Stay hydrated—keep a water bottle nearby and take sips between poses. If you’re practicing in a park, don’t forget to wear mosquito repellent to keep bugs at bay.
Sample Outdoor Yoga Routine (30 Minutes)
This routine is perfect for beginners and intermediate yogis—it’s gentle but challenging, and it focuses on strength, flexibility, and mindfulness. Do each pose for 3–5 breaths, and move slowly and mindfully:
- Mountain Pose (Tadasana): Stand tall, feet hip-width apart, arms at your sides. Close your eyes and take 5 deep breaths. This pose grounds you and prepares your body for the practice.
- Cat-Cow Pose (Marjaryasana-Bitilasana): On your hands and knees, arch your back (cow pose) as you inhale, and round your back (cat pose) as you exhale. Repeat 5–10 times to warm up your spine.
- Downward-Facing Dog (Adho Mukha Svanasana): From hands and knees, lift your hips up and back, pressing your heels toward the ground. Keep your arms straight and your core engaged. Hold for 5 breaths.
- Warrior I (Virabhadrasana I): Step your right foot forward, bend your right knee (keep it over your ankle), and straighten your left leg. Raise your arms overhead, palms facing each other. Hold for 3–5 breaths, then switch sides.
- Warrior II (Virabhadrasana II): Step your feet wide apart, turn your right foot out 90 degrees, and bend your right knee. Extend your arms out to the sides, parallel to the ground. Hold for 3–5 breaths, then switch sides.
- Tree Pose (Vrksasana): Stand tall, shift your weight to your left foot, and place the sole of your right foot on your left inner thigh (avoid your knee). Raise your arms overhead, palms together. Hold for 3–5 breaths, then switch sides. If you need balance, use a tree or a wall for support.
- Seated Forward Fold (Paschimottanasana): Sit with your legs straight, fold forward from your hips, and reach for your feet (or ankles, if you can’t reach your feet). Hold for 5–10 breaths, focusing on stretching your hamstrings and lower back.
- Child’s Pose (Balasana): Kneel on the ground, sit back on your heels, and stretch your arms forward. Rest your forehead on the ground. Hold for 10 breaths—this pose is a resting pose that helps you relax and recover.
- Savasana (Corpse Pose): Lie flat on your back, arms at your sides, palms up. Close your eyes and take deep breaths. Relax your entire body, from your toes to your head. Hold for 5–10 minutes. This is the most important pose—it’s where your body integrates the benefits of the practice.
Tips for Outdoor Yoga Success
- Embrace Imperfection: Outdoor yoga is different from indoor yoga—you might have wind, bugs, or uneven ground. That’s okay! Embrace the chaos and focus on your breath. If you lose balance in tree pose, laugh it off and try again.
- Use Nature as a Prop: Trees are great for balance (use them to steady yourself in tree pose or handstand), and grass is a soft surface for poses like child’s pose or savasana. Be creative—nature is your best yoga prop.
- Try Guided Yoga: If you’re new to yoga, or if you want to mix up your routine, use a guided yoga app (like Down Dog or Yoga with Adriene) on your phone. I often play guided yoga sessions on my outdoor speaker while I practice—it’s like having a yoga instructor in your backyard.
Outdoor Strength Training: Build Muscle Without a Gym
Strength training outdoors is fun, challenging, and a great way to build functional strength (strength that translates to everyday activities). You can use body weight, resistance bands, dumbbells, or any combination of the three. Here’s how to get started:
Sample Outdoor Strength Training Routine (45 Minutes)
This routine works all major muscle groups (legs, arms, core, back) and can be modified for beginners or advanced users. Do 3 sets of each exercise, with 60 seconds of rest between sets:
- Bodyweight Squats: 15 reps. Stand with feet hip-width apart, bend your knees, and lower your hips as if you’re sitting in a chair. Keep your chest up and your knees over your ankles. For added intensity, hold a dumbbell or a slam ball at chest level.
- Push-Ups: 10–12 reps. Get into a plank position, hands slightly wider than shoulder-width apart. Lower your chest toward the ground, then push back up. If push-ups are too hard, do them on your knees. For added intensity, elevate your feet on a bench or a step.
- Resistance Band Rows: 12 reps per side. Anchor a resistance band to a tree or a fence (use the door anchor if you don’t have a tree). Hold the ends of the band, pull your elbows back (squeezing your shoulder blades together), then release slowly. This exercise works your back and biceps.
- Lunges: 10 reps per leg. Step forward with your right leg, bend your right knee (keep it over your ankle), and lower your left knee toward the ground. Push back up to standing, then switch sides. For added intensity, hold dumbbells in each hand.
- Plank: 30–60 seconds. Get into a plank position, elbows under your shoulders, body in a straight line from head to heels. Engage your core and hold. For a challenge, lift one leg or one arm off the ground.
- Dumbbell Shoulder Press: 10 reps. Hold dumbbells at shoulder level, palms facing forward. Press the dumbbells overhead, then lower them slowly. This exercise works your shoulders and triceps.
- Glute Bridges: 15 reps. Lie on your back, knees bent, feet flat on the ground. Lift your hips off the ground (squeezing your glutes), hold for 1 second, then lower slowly. For added intensity, place a resistance band around your thighs or hold a dumbbell on your hips.
- Slam Ball Slams: 10 reps. Hold a slam ball above your head, then slam it down onto the ground (use a rubber mat or concrete). Pick it up and repeat. This exercise is great for your core, arms, and legs, and it’s a great way to release stress.
Tips for Outdoor Strength Training Success
- Start Slow: If you’re new to strength training, start with bodyweight exercises and light weights. Focus on form first—poor form can lead to injury. As you get stronger, add weight or increase the number of reps.
- Stay Hydrated: Strength training makes you sweat, even outdoors. Keep a water bottle nearby and take sips between sets. If it’s hot, add electrolytes to your water to replace lost minerals.
- Mix It Up: Don’t do the same routine every day—mix in different exercises to keep things fun and challenging. For example, one day do bodyweight exercises, another day use resistance bands, and another day use dumbbells. You can also add in calisthenics moves like pull-ups (if you have a dip station) or muscle-ups for a challenge.
Outdoor Running: Explore Your Neighborhood & Boost Endurance
Running outdoors is a great way to get cardio, explore your neighborhood, and clear your mind. Whether you’re a beginner or a seasoned runner, here’s how to make the most of your outdoor runs:
Choose the Right Route
The best running routes are safe, scenic, and适合 your fitness level. If you’re a beginner, start with a flat route (like a neighborhood street or a park trail). If you’re more advanced, add hills to challenge yourself. I love running on local trails—they’re scenic, have less traffic, and are easier on my joints than concrete. You can also use apps like Strava or MapMyRun to find popular running routes in your area.
Pro tip: Avoid running on busy roads—stick to sidewalks, trails, or parks. If you have to run on the road, run against traffic so you can see oncoming cars. Wear bright clothing (especially if you’re running early in the morning or late at night) to make yourself visible.
Sample Outdoor Running Routine (30–45 Minutes)
This routine is perfect for beginners, but it can be modified for advanced runners. The key is to start slow and build endurance:
- Warm-Up (5–10 Minutes): Start with a brisk walk to get your heart rate up. Then, do dynamic stretches (leg swings, high knees, butt kicks, arm circles) to loosen up your muscles. This will help prevent injury.
- Run/Walk Intervals (20–30 Minutes): For beginners, do 1 minute of running followed by 2 minutes of walking. Repeat this cycle for 20–30 minutes. As you get stronger, increase the running time and decrease the walking time (e.g., 2 minutes running, 1 minute walking).
- Cool-Down (5–10 Minutes): Slow down to a brisk walk, then do static stretches (hamstring stretches, quad stretches, calf stretches, hip stretches). Hold each stretch for 30 seconds to 1 minute. This will help your muscles recover and reduce soreness.
For advanced runners: Do a steady-state run (run at a consistent pace for 30–45 minutes) or add intervals (e.g., 30 seconds of sprinting, 1 minute of jogging, repeated for 20–30 minutes). You can also use an agility ladder for warm-up to improve your footwork and speed.
Tips for Outdoor Running Success
- Wear the Right Shoes: As I mentioned earlier, a good pair of running shoes is essential. Replace your shoes every 300–500 miles (or when they start to feel worn out) to avoid injury.
- Listen to Your Body: If you feel pain (not just soreness), stop running. Common running injuries include shin splints, knee pain, and plantar fasciitis. If you have persistent pain, see a physical therapist.
- Stay Consistent: The key to building endurance is consistency. Try to run 3–4 times per week, even if it’s just for 20 minutes. Over time, you’ll notice that you can run longer and faster without getting tired.
- Make It Fun: Listen to music, a podcast, or an audiobook while you run to keep things interesting. You can also run with a friend or join a local running group—having a buddy makes it easier to stay motivated. Many fitness influencers, like David Goggins and Chris Heria, share outdoor running tips and routines on social media if you need inspiration.
Step 4: Stay Motivated & Make Outdoor Fitness a Habit
The hardest part of any fitness routine is staying motivated. Here are the tips that have helped me stick to my outdoor fitness journey for over two years:
- Set Realistic Goals: Don’t try to run a 5K on your first day or do 100 push-ups. Set small, achievable goals (e.g., “I’ll do yoga 3 times this week” or “I’ll run for 20 minutes without stopping”). When you reach a goal, celebrate it—this will keep you motivated to keep going.
- Schedule Your Workouts: Treat your workouts like an appointment—write them down in your calendar or set a reminder on your phone. I schedule my outdoor workouts for 6:30 AM every weekday (before work) and 9:00 AM on weekends. This way, I don’t have time to make excuses.
- Track Your Progress: Use a journal, a fitness app, or a GPS watch to track your workouts. Write down how you felt, how long you worked out, and what exercises you did. Seeing your progress over time is a great motivator—you’ll be amazed at how far you’ve come.
- Change Things Up: Don’t do the same workout every day. Mix in yoga, strength training, running, and even fun activities like hiking or biking. This will keep things interesting and prevent boredom. I also change up my outdoor space occasionally—moving my yoga mat to a different spot in the yard or adding a new piece of equipment—to keep it fresh.
- Don’t Beat Yourself Up: There will be days when you don’t feel like working out—and that’s okay. Take a rest day, or do a light workout (like a 10-minute stretch). The goal is to be consistent, not perfect. I’ve had days where I only did 5 minutes of yoga, and that’s better than nothing.
- Find Your Community: Join a local outdoor fitness group, follow fitness influencers who love outdoor workouts (like Anllela Sagra or Pamela Reif), or workout with a friend. Having a community of people who support your goals makes it easier to stay motivated. You can also share your journey on social media—you might inspire others to start their own outdoor fitness journey too.
Final Thoughts: Embrace the Outdoor Fitness Lifestyle
Outdoor fitness has changed my life in ways I never imagined. It’s not just about getting in shape—it’s about connecting with nature, reducing stress, and finding joy in movement. Whether you have a huge backyard or a tiny balcony, you can create a space that works for you. You don’t need expensive equipment or a fancy gym membership—all you need is a little motivation and a willingness to step outside.
I hope this guide has inspired you to start your own outdoor fitness journey. Remember, it’s not about being perfect—it’s about showing up for yourself, even on the hard days. Whether you’re rolling out a yoga mat at sunrise, lifting dumbbells in your backyard, or running through your neighborhood, you’re taking a step toward a healthier, happier you.
So grab your gear, step outside, and let nature be your gym. You won’t regret it.
P.S. If you have any questions about setting up your outdoor fitness space, choosing equipment, or creating a workout routine, leave a comment below—I’d love to help you on your journey!