
Let’s be real—nothing stings more than opening your monthly energy bill and seeing a number that makes you
The best part? We didn’t have to gut our home or spend a fortune. Most of the changes we made were DIY-friendly, and even the professional upgrades paid for themselves within a year. If you’re tired of watching your hard-earned money go out the window (literally) or want to do your part to reduce your carbon footprint, this guide is for you. I’m going to walk you through the exact home improvements that worked for us—from upgrading windows to optimizing our HVAC system—with all the honest details, cost breakdowns, and real-world results that other blogs skip. No jargon, no hype, just practical advice from someone who’s been in your shoes.
Why Home Energy Efficiency Matters (For Your Wallet and the Planet)
Before we dive into the specifics, let’s talk about why this matters. According to the U.S. Department of Energy, homes and commercial buildings consume 40% of the energy used in the United States—and the average American wastes $200 to $400 every year on energy leaks, outdated systems, and inefficient appliances. That’s money you could be putting toward a vacation, your kids’ college funds, or even just a nicer grocery budget. But it’s not just about saving cash: reducing your home’s energy use also cuts down on greenhouse gas emissions, which is critical as we face increasingly extreme weather and rising global temperatures.
In Europe, the stakes are even higher. With energy prices spiking in recent years—some families saw bills jump by 600 euros—many are struggling to choose between heating their homes and putting food on the table. The European Union estimates that 40% of its energy consumption and 50% of its fossil gas use comes from buildings, and 80% of today’s buildings will still be standing in 2050—most of them inefficient. So whether you’re in the U.S., the UK, Germany, or anywhere else in the West, improving your home’s energy efficiency isn’t just a “nice-to-have”—it’s a necessity.
The good news? You don’t have to be a handyman or a millionaire to make a difference. The improvements I’m sharing are accessible, affordable, and proven to work. Let’s start with one of the biggest energy wasters in any home: windows.
Upgrade to Energy-Efficient Windows: Stop Wasting Energy (and Money) Through Drafts
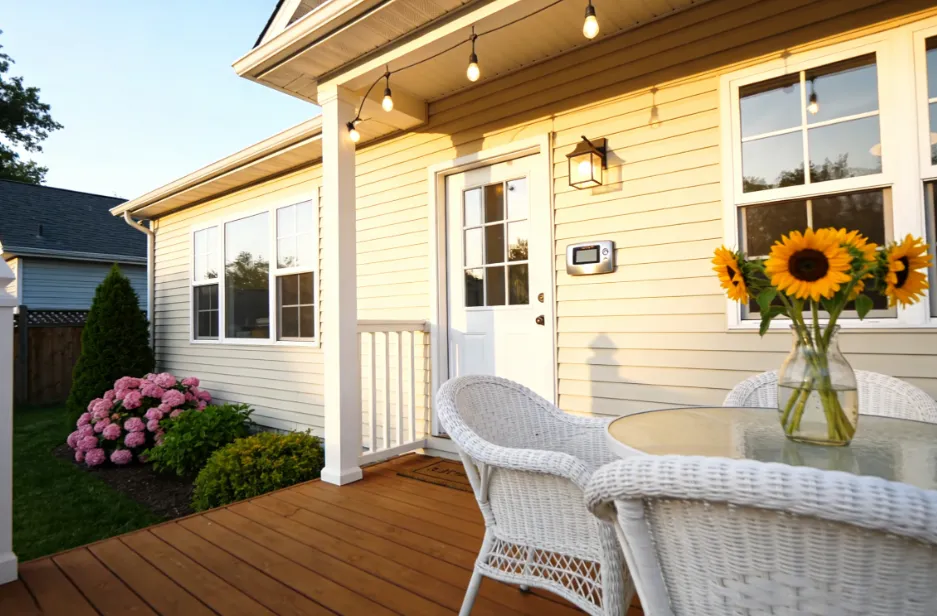
If your home has old, single-pane windows, you’re basically throwing money out the window—literally. I learned this the hard way: last winter, I’d stand next to our living room window and feel a cold draft blowing right through the frame. Our HVAC system was working overtime to keep the house warm, but the heat was escaping through the windows faster than it could be replaced. According to the Department of Energy, heat gain and heat loss through windows account for 25% to 30% of residential heating and cooling energy use—and about 20% of all air infiltration in a home happens through windows, doors, and skylights.
We decided to replace our 20-year-old single-pane windows with ENERGY STAR qualified double-pane windows, and it was one of the best decisions we ever made. Here’s what you need to know if you’re considering the same:
What Makes a Window Energy-Efficient?
Not all “energy-efficient” windows are created equal. The best ones—like the ones we installed—have a few key features:
- Double or triple panes: Unlike single-pane windows, which offer almost no insulation, double or triple panes have a layer of inert gas (usually argon or krypton) between them. This gas acts as a barrier to heat transfer, keeping warm air in during the winter and cool air in during the summer.
- Low-emissivity (low-e) glass: This special coating reflects heat back into your home in the winter and blocks heat from the sun in the summer. It also blocks up to 75% of harmful UV rays, which can fade your furniture, carpets, and curtains over time.
- Insulated frames: Look for frames made from materials like vinyl, fiberglass, or wood-clad vinyl—these materials have better insulating properties than aluminum, which conducts heat and cold easily.
- Proper sealing: Airtight, hermetic sealing prevents drafts and air leaks, which are one of the biggest causes of energy waste.
When shopping for windows, look for the ENERGY STAR label and check the NFRC (National Fenestration Rating Council) ratings. The U-factor measures how well the window insulates (the lower, the better—aim for 0.20 to 0.50), and the SHGC (Solar Heat Gain Coefficient) measures how much solar heat the window lets in (lower is better for hot climates, higher is better for cold climates).
Costs and Savings: Is It Worth the Investment?
I won’t sugarcoat it: replacing windows is a significant upfront investment. We replaced 8 windows in our home, and it cost us about $4,800 (including installation). Single windows can cost between $300 to $1,000 to install, and double-pane windows are $50 to $225 more per window than single-pane ones. But here’s the kicker: we started seeing savings immediately. Our heating bill dropped by $70 per month in the winter, and our cooling bill dropped by $50 per month in the summer. Over the course of a year, that’s $1,440 in savings—meaning the windows will pay for themselves in just over 3 years.
If you can’t afford to replace all your windows right now, there are cheaper alternatives. Adding storm windows can reduce heat loss through windows by 25% to 50% and costs a fraction of full replacement. You can also seal air leaks around windows with caulk or weather stripping—this costs less than $20 per window and can save you 5% to 30% on your annual energy bills. We did this for our basement windows before replacing the main ones, and it made a noticeable difference in the draftiness of the room.
Switch to LED Bulbs: The Simplest Energy-Saving Hack (That You’re Probably Not Using)
Let’s talk about the easiest, cheapest energy improvement you can make: replacing your old incandescent bulbs with LED bulbs. I’ll admit, I was skeptical at first. I thought LEDs were dim, expensive, and didn’t give off the warm light I loved. But boy, was I wrong. Today’s LED bulbs are bright, affordable, and come in a variety of warm tones—plus, they save you a ton of money in the long run.
Here’s the data: Residential LEDs use at least 75% less energy and last up to 25 times longer than incandescent bulbs. Let’s break that down with numbers from USAI Lighting: a 60-watt incandescent bulb uses 60 watts of electricity, costs about $328.59 per year (for 30 bulbs), and lasts only 1,200 hours. A comparable LED bulb uses just 6-8 watts, costs $32.85 per year, and lasts 50,000 hours. That’s a savings of $295.74 per year—for doing nothing more than changing a light bulb.
We replaced every bulb in our home with ENERGY STAR certified LEDs, and it cost us about $80 total (we had 25 bulbs). The first month, our electricity bill dropped by $18—and that’s with us using the lights just as much as before. The bulbs have also lasted way longer: we haven’t had to replace a single one in over 2 years.
Pro Tips for Choosing LED Bulbs
- Look for “warm white” bulbs (2700K to 3000K) if you want that cozy, incandescent-like glow. Cool white (4000K+) is better for kitchens, garages, and workspaces where you need bright light.
- Check the “lumens” (not watts) to get the right brightness. A 60-watt incandescent bulb is about 800 lumens, so look for LEDs with 800 lumens for the same brightness.
- Don’t forget outdoor lights! LED holiday lights are safer (they stay cool), sturdier (made with epoxy, not glass), and use far less energy than incandescent ones. You can connect up to 25 strings of LEDs without overloading a socket—perfect for holiday decorations.
If you’re on a tight budget, replace one bulb at a time. Start with the bulbs you use most (like the ones in your living room, kitchen, and bedroom) and work your way around the house. Every little bit helps.
Optimize Your HVAC System: The Biggest Energy Hog in Your Home
Heating and cooling account for nearly half of all home energy costs—for the average American household, that’s more than $900 per year. In colder regions like Canada, heating alone can account for up to 60% of a home’s energy use. Our old HVAC system was 15 years old, loud, and inefficient—and it was costing us a fortune. We knew we needed to optimize it, but we didn’t want to spend $10,000 on a new system. Here’s what we did instead (and what you can do too) to cut HVAC energy use by 20-30%.
1. Install a Smart Thermostat
This was one of the best investments we made—costing just $150, and it saved us $100+ per year. Smart thermostats (like the Nest or Ecobee) learn your schedule and adjust the temperature automatically. For example, if we leave for work at 8 AM, the thermostat turns the heat down to 62°F (17°C) and turns it back up to 68°F (20°C) right before we get home. We can also control it from our phones, so if we’re stuck at work late, we can delay turning up the heat.
ENERGY STAR smart thermostats are even better—they can save you up to 10% on heating and cooling costs just by adjusting the temperature by 7-10°F for 8 hours a day. If you don’t want to splurge on a smart thermostat, a programmable thermostat (which costs about $30) works almost as well—just set it to lower the temperature at night and when you’re away.
2. Maintain Your HVAC System Regularly
Most people forget to maintain their HVAC systems, but neglecting them can make them 15% less efficient—and lead to costly repairs. Here’s what you need to do:
- Change the filter every 1-3 months: A clogged filter reduces airflow by up to 50%, forcing your system to work harder and use more energy. Filters cost $5-$20 each, and changing them takes 2 minutes.
- Get a professional tune-up every year: Just like your car, your HVAC system needs annual maintenance. A technician will clean the coils, check refrigerant levels, test electrical connections, and calibrate the thermostat—all of which keep your system running efficiently. A tune-up costs about $100-$150, but it can save you hundreds in energy costs and prevent expensive breakdowns.
- Seal leaky ducts: Leaky ducts waste 20-30% of conditioned air—meaning your HVAC system is heating or cooling air that’s just escaping into the attic or walls. You can seal ducts yourself with mastic or specialized tape (costing $20-$50) or hire a professional. We did it ourselves, and it saved us $40 per month on our energy bill.
3. Upgrade to an Energy-Efficient HVAC System (If You Can)
If your HVAC system is more than 10 years old and requires frequent repairs, it’s probably time to replace it. New ENERGY STAR certified systems are 30% more efficient than older models. We ended up replacing our system after 15 years—it cost $6,500, but we’re saving $180 per month on heating and cooling. The system will pay for itself in just over 3 years.
For European families, heat pumps are a great option. They have an efficiency ratio (COP) of over 3, meaning they produce 3 units of heat for every 1 unit of electricity used—far more efficient than gas boilers. Many European governments offer subsidies for heat pumps, making them more affordable. In the U.S., heat pumps are also gaining popularity, especially in milder climates.
4. Use Zoning Systems (For Multi-Story Homes)
If you have a multi-story home, you know that the second floor is always hotter than the first (thanks to heat rising). A zoning system lets you control the temperature in different parts of your home independently, so you don’t have to cool the entire house just because the second floor is warm. This can save you 10-20% on your HVAC bills—and make your home more comfortable. Zoning systems cost about $1,000-$2,000 to install, but they’re worth it for larger homes.
Add Insulation: The Unsung Hero of Energy Efficiency
Insulation is one of the fastest and most cost-effective ways to reduce energy waste—but it’s often overlooked. When we had our home energy audit (which I’ll talk about next), the auditor told us that our attic was severely under-insulated. Most homes in the U.S. and Europe have less insulation than they need, especially older homes.
Adding insulation to your attic, crawl space, or exterior walls helps keep your home cool in the summer and warm in the winter. According to ENERGY STAR, sealing air leaks and adding insulation to your attic can save you up to 10% on your annual energy bills. We added R-38 insulation to our attic (the recommended minimum for most U.S. climates) for $800, and it saved us $50 per month on our heating bill.
What Type of Insulation Should You Use?
- Fiberglass insulation: This is the most common and affordable type. It comes in batts or rolls and is easy to install yourself (great for DIYers).
- Spray foam insulation: This is more expensive, but it’s better at sealing air leaks. It’s ideal for hard-to-reach areas, like around windows and doors.
- Cellulose insulation: Made from recycled paper, this is an eco-friendly option. It’s great for attics and crawl spaces.
The key is to choose the right R-value (a measure of insulation’s effectiveness). The higher the R-value, the better the insulation. For attics, aim for R-38 to R-60; for exterior walls, R-13 to R-21. You can check the recommended R-values for your climate on the Department of Energy’s website.
Start with a Home Energy Audit: Find Exactly Where You’re Wasting Energy
Before you start making improvements, it’s a good idea to get a home energy audit. This is a professional assessment that identifies where your home is wasting energy—and what improvements will give you the biggest bang for your buck. Most energy audits cost $100-$200, but many utility companies offer free or discounted audits to their customers.
Our energy audit was eye-opening. The auditor used an infrared camera to pinpoint air leaks around our windows and doors, a blower door to measure how much air was escaping, and tested our insulation levels. He told us that our biggest energy wasters were our windows (30% of energy loss), our attic insulation (25%), and our leaky ducts (20%). This helped us prioritize our improvements—we focused on the areas that would save us the most money first.
If you can’t afford a professional audit, you can do a DIY version. Walk around your home and check for drafts: hold a lit candle near windows, doors, and electrical outlets—if the flame flickers, there’s a leak. You can also check your insulation by looking in your attic (if it’s less than 10 inches thick, you need more).
Smaller Improvements That Add Up
You don’t have to make big, expensive changes to save energy. Here are some small, DIY-friendly improvements that we made—each one saved us a little bit, but together they added up to big savings:
- Install insulated drapes: These thick, heavy drapes block drafts and keep heat in during the winter. We bought them for our living room and bedroom for $50 each, and they saved us $15 per month.
- Use weather stripping on doors: This costs $5 per door and seals gaps around the door frame, preventing drafts. We did this for all our exterior doors, and it made a noticeable difference in the draftiness of our home.
- Unplug unused electronics: Electronics like phone chargers, TVs, and coffee makers use energy even when they’re not in use (this is called “phantom energy”). We plugged all our electronics into power strips and turned them off when we’re not using them—this saved us $10 per month.
- Use ceiling fans: In the summer, ceiling fans circulate cool air, so you can turn up your AC by a few degrees. In the winter, reverse the fan to push warm air down from the ceiling. This saved us $20 per month on cooling and heating.
- Upgrade to an energy-efficient water heater: Your water heater is the second-highest energy user in your home. We replaced our old water heater with an ENERGY STAR certified heat pump water heater, and it saved us over $300 per year. If you can’t afford a new one, wrap your water heater in an insulation blanket (costs $20) to keep it warm.
Final Thoughts: Energy Efficiency Is a Journey, Not a Destination
Improving your home’s energy efficiency isn’t something you do overnight—it’s a series of small, intentional choices that add up over time. When we started, we didn’t have the money to replace all our windows or our HVAC system at once. We took it step by step: first, we changed our light bulbs and did a DIY energy audit. Then, we sealed air leaks and added insulation. Next, we installed a smart thermostat. Finally, we replaced our windows and HVAC system.
Today, our home is not only more energy-efficient—it’s also more comfortable. We no longer have cold drafts in the winter or hot spots in the summer. Our energy bills are predictable, and we’re saving over $2,000 per year. Plus, we’re doing our part to reduce our carbon footprint—which feels good.
The best part? Anyone can do this. You don’t need to be a handyman, a millionaire, or an environmental expert. All you need is a little motivation and a willingness to take the first step. Whether you start with changing a light bulb, sealing a draft, or getting an energy audit, every improvement counts.
So what are you waiting for? Grab a candle, check for drafts, and start making changes. Your wallet (and the planet) will thank you.
P.S. Don’t forget to check for government incentives! In the U.S., the Inflation Reduction Act offers tax credits for energy-efficient home improvements (up to $3,200 per year). In Europe, many countries offer subsidies for heat pumps, insulation, and energy-efficient windows. These incentives can help offset the cost of your upgrades—so be sure to do your research!