
Let me start by being real with you: Remodeling your kitchen and bathroom isn’t just a home improvement project—it’s a journey. A journey filled with excitement (envisioning that sleek new kitchen island or spa-like shower), stress (why does a single tile cost so much?), and endless decisions (granite or quartz? Freestanding tub or walk-in shower?). I recently wrapped up a 4-month remodel of both spaces in my suburban Chicago home, and let me tell you: I made mistakes, I learned hard lessons, and I walked away with spaces that feel like a dream—but only after doing my homework (and then some).
If you’re gearing up to tackle your own kitchen or bathroom remodel in 2026, you’re in the right place. I’m not a professional contractor or interior designer—just a regular homeowner who spent hours poring over Houzz, Angi, and This Old House, talked to dozens of local pros, and tested out what works (and what absolutely doesn’t) for everyday life. This guide is packed with practical, no-BS advice, material tips that won’t break the bank, budget breakdowns based on 2026 data, and the trends that are actually worth investing in (spoiler: warm woods and smart tech are non-negotiable this year).
Whether you’re doing a minor refresh (new paint, updated fixtures) or a full gut remodel (knocking down walls, rerouting plumbing), this guide will help you avoid the mistakes I made, stay on budget, and create spaces that are both beautiful and functional—because let’s be honest: A kitchen that looks amazing but doesn’t work for meal prep is useless, and a bathroom that’s Instagram-worthy but impossible to clean is a nightmare. Let’s dive in.
First Things First: Prep Work That Saves You Time, Money, and Headaches
Before you pick out a single tile or cabinet, you need to lay the groundwork. This is the part most people skip, and it’s the biggest mistake you can make. Trust me—I skipped a few steps early on, and it cost me an extra $1,200 and two weeks of delays. Here’s what you need to do first:
1. Define Your “Why” (and Stick to It)
Ask yourself: Why are you remodeling? Is it to update an outdated space? To increase your home’s resale value? To make it more functional for your family (think: a larger kitchen for a growing family or a walk-in shower for aging in place)? Or is it just to treat yourself to a little luxury?
My “why” was twofold: My 1990s kitchen had peeling laminate countertops, a cramped layout, and appliances that were on their last legs. My bathroom had a tiny tub that no one used, mold around the shower, and storage so limited I had to keep my toiletries in a plastic bin under the sink. I wanted spaces that were modern, functional, and added value to my home (since I plan to sell in 5 years).
Your “why” will guide every decision—from materials to layout to budget. If resale value is your top priority, you’ll want to focus on timeless designs and high-ROI upgrades (we’ll get to those later). If it’s for your own comfort, you can splurge on personal touches that make you happy (hello, heated bathroom floors!).
2. Set a Realistic Budget (and Add 10-15% for Surprises)
This is non-negotiable. According to 2026 data from Angi and This Old House, the average kitchen remodel costs $27,000 (ranging from $15,000 to $42,000), and the average bathroom remodel costs $12,000 (ranging from $6,600 to $18,000). But these numbers vary wildly based on where you live (cities like New York or Los Angeles are 20-30% more expensive than suburban areas), the size of the space, and the quality of materials you choose.
When I set my budget, I started by researching local costs. I called 3 local contractors for estimates, and I was shocked at how much variation there was—one quoted me $35,000 for the kitchen, another $28,000, and the third $22,000. I went with the middle quote, but I added 15% to the total ($4,200) for unexpected expenses—and thank goodness I did. Halfway through the remodel, we discovered water damage behind the kitchen walls that needed to be repaired, which cost $1,800. Without that buffer, I would have been stuck scrambling for cash.
Pro tip from a This Old House expert: Always add 10-15% to your contractor’s estimate to cover unforeseen issues like water damage, mold removal, or structural repairs. These surprises are inevitable—don’t let them derail your project.
3. Decide: DIY or Hire Pros?
I’m all for DIY projects—painting, installing new light fixtures, even tiling a backsplash—but when it comes to kitchen and bathroom remodels, some jobs are better left to the pros. According to a 2023 survey, 70% of U.S. homeowners try at least one DIY project to save money, but 60% hire pros for larger jobs. Here’s my rule of thumb:
DIY if you can: Paint walls, install new hardware (cabinet knobs, towel bars), replace light fixtures, tile a backsplash (if you’re handy), or refinish cabinets. These tasks are relatively easy, require minimal tools, and can save you hundreds of dollars in labor costs.
Hire pros for: Rerouting plumbing or electrical, knocking down walls, installing countertops (especially stone), tiling a shower (waterproofing is crucial!), or any structural work. I tried to DIY tiling my shower, and after 2 days of frustration and a lopsided first row, I called in a pro. It cost me an extra $500, but it was worth it to avoid water damage down the line.
Pro tip: If you’re hiring pros, always check their reviews on Angie’s List or Houzz, ask for references, and get a written contract that outlines the scope of work, timeline, and payment schedule. Never pay more than 30% upfront—this protects you from scams.
4. Get the Right Permits
This is another step people skip, and it can cost you big time. If you’re doing any work that involves electrical, plumbing, or structural changes (like knocking down a wall), you’ll need a permit from your local building department. Permit costs vary by location, but they typically range from $100 to $500.
I made the mistake of skipping a permit for my kitchen electrical work, and a building inspector stopped by mid-project. I had to pause work for a week, pay a $200 fine, and get the permit retroactively. Don’t be me—check with your local government before you start. Most contractors will handle permits for you, but it’s still good to know what’s required.
Kitchen Remodel: Practical Tips, Hacks, and Layout Ideas (2026 Trends Included)
The kitchen is the heart of the home—at least in my house. It’s where I cook, where my kids do homework, and where we gather for Sunday brunch. So when I remodeled mine, I wanted it to be functional, stylish, and built to last. Here’s everything I learned:
Layout: Prioritize Functionality (The Work Triangle Is Key)
The work triangle—between your sink, stove, and refrigerator—is the golden rule of kitchen design. The distance between each should be between 4 and 9 feet, and there should be no obstacles (like a island or chair) in the way. This makes meal prep easier and saves you from walking back and forth across the kitchen.
My old kitchen had a terrible layout: the sink was on one wall, the stove on another, and the fridge across the room. I spent hours walking back and forth while cooking, and it was exhausting. For the remodel, I rearranged the layout to create a perfect work triangle, and it’s been a game-changer.
2026 kitchen trends are all about functionality and connection. According to the National Kitchen & Bath Association (NKBA), 85% of homeowners want a dedicated beverage area, 64% want a pet feeding station, and 59% want an eat-in kitchen. If you have the space, adding an island with storage and seating is a great way to maximize functionality—just make sure it’s not too big (leave at least 36 inches of space around it for walking).
Cabinets: Save Money Without Sacrificing Style
Cabinets are one of the biggest expenses in a kitchen remodel—they can cost anywhere from $5,000 to $15,000, depending on the material and style. But you don’t have to spend a fortune to get beautiful, durable cabinets. Here’s how I saved:
1. Reface instead of replace: If your cabinets are structurally sound but outdated, refacing them is a fraction of the cost. You’ll replace the doors and drawer fronts, add new hardware, and paint or stain the frames. I refaced my upper cabinets (cost: $2,500) and replaced the lower ones (cost: $3,000) because they were damaged. Total cost: $5,500—way less than replacing all cabinets ($8,000+).
2. Choose ready-to-assemble (RTA) cabinets: RTA cabinets are cheaper than custom or semi-custom cabinets, and they’re easy to install (even for DIYers). I bought mine from IKEA, and they’re still going strong 6 months later. Just make sure to read reviews—some RTA cabinets are flimsy, so stick to reputable brands.
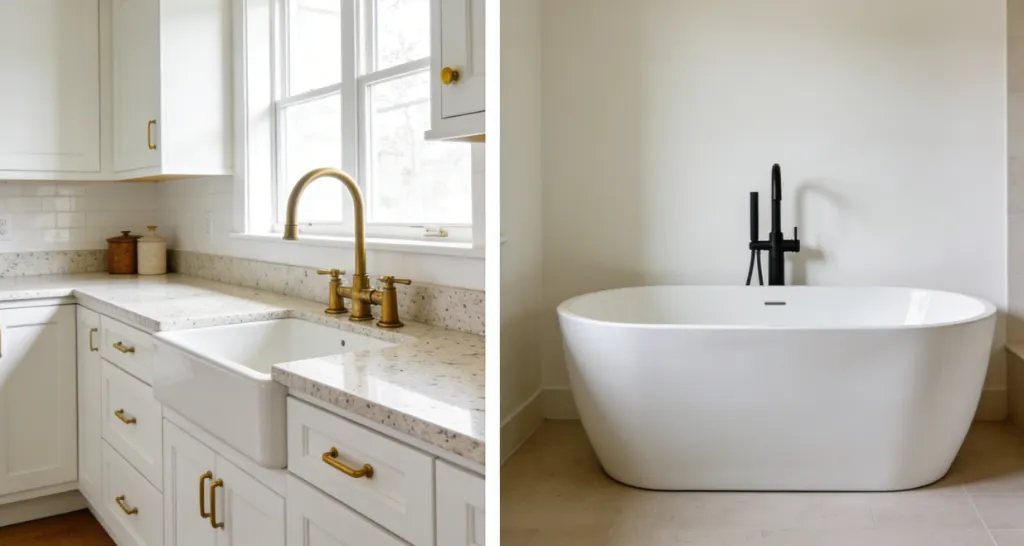
3. Go for simple, timeless styles: Shaker-style cabinets are always in style, and they’re cheaper than more elaborate designs. I chose white shaker cabinets with brass hardware, and they look modern and classic—perfect for resale value.
2026 trend alert: Warm wood finishes are huge this year. James Martin Vanities’ Brittany collection debuted a refined pecan finish that’s perfect for cabinets, and Kohler’s Claude vanity line features warm wood tones that add coziness to any kitchen. If you want to add warmth, consider wood cabinets in a medium tone (like oak or pecan) or add wood accents to white cabinets.
Countertops: Balance Durability, Style, and Budget
Countertops are another big expense, but they’re worth investing in—they get a lot of use, and they set the tone for your kitchen. Here’s a breakdown of the most popular materials in 2026, along with their pros, cons, and price points (per square foot):
- Quartz: $50-$100. This is my top pick—and what I chose for my kitchen. Quartz is non-porous (so it doesn’t stain), scratch-resistant, and low-maintenance. It comes in a variety of colors and patterns, including ones that look like marble or granite. It’s more expensive than laminate but cheaper than natural stone, and it’s perfect for busy families.
- Granite: $40-$80. Granite is a natural stone that’s durable and beautiful—no two slabs are the same. But it’s porous, so it needs to be sealed every 1-2 years to prevent staining. It’s also heavier than quartz, so you may need to reinforce your cabinets.
- Laminate: $20-$40. Laminate is the cheapest option, and it’s available in a variety of styles (including fake granite and quartz). But it’s not as durable— it can scratch and chip easily, and it’s hard to repair. Good for renters or anyone on a tight budget.
- Marble: $70-$150. Marble is luxurious and beautiful, but it’s porous and prone to staining and scratching. It’s best for homeowners who are willing to put in the maintenance (sealing, avoiding acidic foods like lemon juice).
Pro tip: If you love the look of marble but don’t want the maintenance, go for quartz that mimics marble. I did this, and no one can tell the difference—except me, when I spill coffee and don’t have to panic.
Flooring: Slip-Resistant, Easy-to-Clean, and Stylish
Kitchen flooring needs to be durable, slip-resistant, and easy to clean—let’s be real, spills are inevitable. Here are the best options for 2026:
- Porcelain Tile: $10-$30 per square foot. This is the most popular choice for kitchens. Porcelain is waterproof, scratch-resistant, and easy to clean. It comes in a variety of styles, including ones that look like wood or stone. I chose porcelain tile that looks like hardwood, and it’s been perfect—no scratches, no stains, and it’s easy to mop.
- Vinyl Plank: $5-$15 per square foot. Vinyl is affordable, waterproof, and easy to install (great for DIYers). It looks like wood or stone, and it’s soft underfoot. But it’s not as durable as porcelain, and it can fade in direct sunlight.
- Hardwood: $15-$30 per square foot. Hardwood is beautiful and timeless, but it’s not waterproof—spills can cause warping. It’s best for kitchens that don’t get a lot of moisture, or for homeowners who are willing to take the risk.
Pro tip: Choose flooring with a matte finish—glossy floors are slippery when wet, which is dangerous in a kitchen.
Appliances: Invest in the Ones You Use Most
Appliances can cost anywhere from $3,000 to $10,000, so it’s important to prioritize. I use my refrigerator, oven, and dishwasher every day, so I splurged on those. I saved on the microwave and toaster oven—they’re functional but not something I use as often.
2026 trend alert: Smart appliances are gaining traction. Wi-Fi-enabled, app-controlled appliances and built-in wireless charging are becoming more popular, along with steam cooking and powerful vent hoods. I bought a smart refrigerator that lets me check the contents from my phone (game-changer for grocery shopping!) and a smart oven that I can preheat from work. Worth every penny.
Pro tip: Buy appliances from the same brand—they’ll match, and you may get a discount. Also, wait for sales (Black Friday, Memorial Day) to save hundreds of dollars.
Lighting: Don’t Underestimate Its Importance
Lighting is one of the most overlooked aspects of kitchen design, but it’s crucial. A well-lit kitchen is easier to cook in, and it makes the space feel brighter and more inviting. According to 2026 kitchen trends, 87% of experts say statement lighting is in, and 92% recommend task lighting for work zones. Here’s how to light your kitchen:
- Task Lighting: Under-cabinet lights are a must—they illuminate your countertops, making it easier to chop vegetables and cook. I installed LED under-cabinet lights, and they’re a game-changer. Pendant lights over the island are also great for task lighting.
- Ambient Lighting: Recessed lights or a chandelier provide overall lighting for the space. I installed recessed lights in my kitchen, and they make the space feel bright and open.
- Accent Lighting: LED strips inside cabinets or under the island add a touch of ambiance. I added LED strips under my island, and they look amazing at night.
Bathroom Remodel: Spa-Like Comfort, Practicality, and 2026 Trends
The bathroom is your personal retreat—a place to relax after a long day, get ready in the morning, and unwind. My old bathroom was anything but a retreat: tiny, dark, and full of mold. Now, it’s my favorite room in the house. Here’s how to create a bathroom that’s both functional and luxurious:
Layout: Maximize Space (Even in a Small Bathroom)
Most bathrooms are small, so it’s important to maximize space. Here are my top tips:
- Install a wall-mounted vanity: This frees up floor space, making the bathroom feel larger. I installed a wall-mounted vanity, and it’s amazing how much space it saved— I can now fit a small storage cabinet under it.
- Choose a walk-in shower instead of a tub: Tubs take up a lot of space, and most people don’t use them very often. A walk-in shower is more functional and makes the bathroom feel larger. If you love baths, consider a freestanding tub—they’re stylish and take up less space than built-in tubs.
- Use corner shelves: Corner shelves are a great way to add storage without taking up valuable space. I installed corner shelves in my shower for shampoo, conditioner, and body wash.
2026 bathroom trends: Softened traditional style is in—think furniture-inspired vanities, sculptural freestanding tubs, and subtle classical details. Kohler’s new Claude collection features a sculptural freestanding bath with a deep soaking profile, and Moen’s Smyth bathroom suite has fluted handles and softly squared spouts that blend traditional and modern styles.
Flooring and Wall Tiles: Water-Resistant and Easy to Clean
Bathroom flooring and wall tiles need to be waterproof—moisture is inevitable. Here’s what to choose:
Flooring:
- Porcelain Tile: $10-$30 per square foot. Same as kitchen flooring—porcelain is waterproof, scratch-resistant, and easy to clean. I chose porcelain tile with a non-slip texture for my bathroom floor, and it’s perfect.
- Vinyl Plank: $5-$15 per square foot. Affordable and waterproof, but not as durable as porcelain. Good for small bathrooms or renters.
- Natural Stone: $20-$50 per square foot. Marble or travertine are beautiful, but they’re porous and need to be sealed. Best for homeowners who are willing to put in the maintenance.
Wall Tiles:
- Ceramic Tile: $5-$15 per square foot. Ceramic is waterproof, easy to clean, and affordable. It comes in a variety of colors and patterns. I used ceramic tile for my shower walls, and it looks great.
- Glass Tile: $15-$30 per square foot. Glass tile is beautiful and reflective, making the bathroom feel brighter. It’s easy to clean, but it’s more expensive than ceramic. Great for backsplashes or accent walls.
- Mosaic Tile: $10-$25 per square foot. Mosaic tiles are small (usually 1×1 inch) and come in a variety of materials (ceramic, glass, stone). They’re perfect for shower floors (non-slip!) or accent walls.
Pro tip from Houzz: When choosing tiles, ask yourself three questions: Where will the tile be placed? What’s your budget? How often will it be used? Floor tiles need to be slip-resistant, while wall tiles can be more decorative.
Fixtures: Upgrade for Comfort and Style
Fixtures are the finishing touches of your bathroom, and they can make a big difference in both style and functionality. Here’s what to focus on:
- Faucets: $100-$500. Choose a faucet that’s easy to use and matches your style. I chose a matte black faucet— it’s modern and hides water spots. 2026 trend: Single-handle faucets are more popular than double-handle—they’re easier to use and look sleeker.
- Shower Head: $50-$300. A good shower head can turn your daily shower into a spa experience. I installed a rain shower head with a handheld attachment— it’s perfect for rinsing off and cleaning the shower.
- Toilet: $200-$500. Invest in a high-efficiency toilet—it saves water and is more comfortable. I chose a smart toilet with a heated seat and bidet function—worth every penny (especially on cold mornings!).
- Vanity and Sink: $500-$2,000. A wall-mounted vanity saves space, while a freestanding vanity adds style. I chose a wall-mounted vanity with a vessel sink— it’s modern and easy to clean.
2026 trend: Smart fixtures are becoming more popular in bathrooms too. Kohler’s Claude smart toilet conceals advanced technology within a traditionally styled form, and Moen’s Smyth collection includes smart shower fixtures that you can control with your phone.
Storage: Keep Your Bathroom Clutter-Free
Clutter can make even the most beautiful bathroom feel small and messy. Here’s how to add storage without taking up too much space:
- Install a medicine cabinet: A recessed medicine cabinet saves space and provides storage for toiletries. I installed one with a mirror, and it’s perfect for storing my makeup, toothbrush, and other small items.
- Use drawer organizers: Drawer organizers keep your vanity drawers neat and organized. I use them for my makeup, hair tools, and jewelry.
- Add a towel rack or shelf: A wall-mounted towel rack or shelf provides storage for towels and keeps them off the floor. I installed a double towel rack— it holds all of our towels and looks stylish.
Lighting and Ventilation: Don’t Skip These
Lighting and ventilation are crucial in a bathroom—moisture can lead to mold and mildew, and poor lighting makes it hard to get ready.
- Lighting: Install vanity lights on either side of the mirror—they eliminate shadows and make it easier to apply makeup or shave. I also installed a recessed light in the shower and a small chandelier above the vanity for ambiance.
- Ventilation: A good exhaust fan is a must—it removes moisture and prevents mold. I installed a quiet exhaust fan with a humidity sensor— it turns on automatically when the humidity is high.
Budget Breakdown: How to Allocate Your Money (2026 Data)
Now, let’s talk about the most important part: budget. Based on my own remodel and 2026 industry data, here’s how to allocate your money for both kitchen and bathroom remodels. Remember, these are averages—your costs will vary based on location, size, and materials.
Kitchen Remodel Budget (Average: $27,000)
- Cabinets: 30-40% ($8,100-$10,800). This is the biggest expense—if you’re on a budget, reface instead of replace.
- Countertops: 15-20% ($4,050-$5,400). Quartz is the best balance of price and durability.
- Appliances: 15-20% ($4,050-$5,400). Splurge on the ones you use most (refrigerator, oven, dishwasher).
- Flooring: 10-15% ($2,700-$4,050). Porcelain tile is the most cost-effective option.
- Lighting: 5-10% ($1,350-$2,700). Don’t skimp on under-cabinet lights—they’re worth it.
- Hardware and Accessories: 5-10% ($1,350-$2,700). Cabinet knobs, drawer pulls, and a faucet.
- Labor: 20-30% ($5,400-$8,100). If you DIY some tasks, you can save here.
- Contingency (10-15%): $2,700-$4,050. For unexpected expenses.
Bathroom Remodel Budget (Average: $12,000)
- Fixtures (Toilet, Sink, Shower, Faucets): 30-40% ($3,600-$4,800). Invest in quality fixtures—they last longer.
- Tiles (Flooring and Walls): 20-25% ($2,400-$3,000). Ceramic or porcelain is the most affordable option.
- Vanity and Countertop: 15-20% ($1,800-$2,400). Wall-mounted vanities save space and money.
- Lighting and Ventilation: 5-10% ($600-$1,200). Exhaust fan is a must.
- Hardware and Accessories: 5-10% ($600-$1,200). Towel racks, toilet paper holder, and mirror.
- Labor: 20-30% ($2,400-$3,600). Hire a pro for plumbing and tiling.
- Contingency (10-15%): $1,200-$1,800. For water damage or mold removal.
Common Mistakes to Avoid (I Learned These the Hard Way)
No matter how much you plan, there will be hiccups—but you can avoid these common mistakes:
- Skipping the contingency fund: As I mentioned earlier, unexpected expenses are inevitable. Don’t skip this—you’ll regret it.
- Choosing style over functionality: A beautiful kitchen is great, but if you can’t cook in it, it’s useless. Same with a bathroom—don’t choose a tiny sink just because it looks good.
- Not measuring correctly: I made this mistake with my kitchen island—I measured wrong, and it was too big. I had to send it back and wait for a new one, which delayed the project by a week. Measure twice, order once.
- Hiring the wrong contractor: Don’t hire the first contractor you find. Do your research, check reviews, and get multiple quotes.
- Overspending on trends: Trends come and go—stick to timeless designs for big-ticket items (cabinets, countertops). You can add trendy accents (hardware, paint) that are easy to change.
Final Thoughts: Enjoy the Process (and the End Result)
Remodeling your kitchen and bathroom is a lot of work—there will be days when you’re stressed, frustrated, and wondering why you ever started. But when you walk into your new kitchen and cook your first meal, or step into your new shower after a long day, it will all be worth it.
Remember: This is your space—make it work for you. Don’t compare your remodel to others on Instagram or Pinterest. Focus on what you need, what you love, and what fits your budget. And if you make a mistake? It’s okay—no remodel is perfect.
I hope this guide helps you on your remodeling journey. If you have any questions, feel free to leave a comment below—I’m happy to share more of my experiences. And when your remodel is done, don’t forget to take a step back and enjoy your beautiful new spaces. You earned it!
P.S. If you’re looking for more specific recommendations (like my favorite tile brand or contractor), let me know—I’m happy to share!